By request I added the quickpage in PNG format. The link is in the post below with the other links!
Thank you all, again, for the wonderful comments on the kit and Candy's album.
Donnatopia- thank you for the link Shutterfly and the idea for a photobook :). I have a few 8x8 albums already on hand (I buy them when they go on sale) and I have one of those large format printers(not that I need it for 8x8) so I printed Candy's pages out yesterday and they turned out so nice. I also added a page with the story of Rainbow Bridge and those stick-on acid free clear envelopes with her tag and a tuft of fur.
Thursday, March 29, 2007
Tuesday, March 27, 2007
Final add-on Freebie!

This REALLY is the last add-on for this kit, LOL! I've never made a quickpage before so this one is in PNG format but if you need it in another format...please let me know! Enjoy!
Quickpage PNG
Quote and Ribbon
Final 2 layouts and a re-do!
 Credits: Notepaper from Weeds & Woldflower's Welcoming Spring freebie; Felt and metal edge actions from Tandika Star at DigiScrapDesigner; Folded corner technique from Scrapper's Guide on frame (see post below for link); Font is Dupree.
I have to admit I'm a little sad to see this album come to an end. It has been great therapy for me and I highly recommend it for those that have lost a furbaby! I have enjoyed sharing it with all of you that have visited my blog and downloaded my freebies and left wonderful comments! This is the last picture I took of Candy one week before we suddenly and unexpectedly had to say goodbye. I knew she was ill but I really thought we would would have lots more time with her. She LOVED the snow and this was the last time she got to play in it. I don't know what possessed me to get my camera out that day but I'm so glad I did! She would've been 14 on April 3rd.
 Credits: Triple Pic Template by SStanton: Wild tear and silver actions by Atomic Cupcake.
The only thing that bumms me out about this page is that I don't have a single picture of Candy with my yougest son, Riley. I know I tried many times but neither one would sit still long enough for me to get one. So, it doesn't feel complete :(

Credits: Sketch by Leanncang from 3Sprapateers: Fonts are Dupree, Army condensed,Beautiful ES and Type keys filled.
I redid this layout completely! The original is a few posts down titled "Happiness is" I can live with this one. It's hard to make a layout with more than 3 pictures and make it look good without making the pics too small. I would've preferred to make a seperate layout for each pic but that would give me too many pages to fit in my album so I had to condense. TFL!
Sunday, March 25, 2007
Folded Corner
First off, Big thanks for the wonderful comments on Candy's christmas page. If you don't already know how to do a folded corner and want to learn...I'll give you a link to a video tutorial that I used to make my corner. It will cost you a $1 but it is such a great technique to know that it is worth all 100 pennies! While you're at it, sign up for her free newsletter and you will get a free technique every week for PS/PSE (usually a video) .The techniques are free for a week and then they go into the store and can be purchased for a $1. You can get more if you become a premier member but I think it's around $40 or something. The tutorial is called Painted Shadows and you can get it HERE .
Also, if you like all the felt and want more if it, you can purchase the felt action I used to make this kit HERE.
Now go forth and CREATE!!!!!!
Also, if you like all the felt and want more if it, you can purchase the felt action I used to make this kit HERE.
Now go forth and CREATE!!!!!!
Friday, March 23, 2007
Santa dog

Credits: Folded corner technique from Scrapper's Guide; Felt action by Tandika Star; Font is Edible pet.
Candy's album wouldn't be complete without her Christmas pics! She was always so tolerant of things like that. (notice Kayla in the background with a look on her face as if to say "please don't try to put that silly hat on me again").
Thursday, March 22, 2007
Freebie! Collars and tags


OK, I said the last freebie was going to be IT for the Felty kit but I went ahead and made this an add-on too, becuase I realized I never included a peach background in the original kit. As you can see, though, I made the collars and tags a neutral color so they can be used with any kit! Scroll down a bit to see a tutorial on how to engrave your tag in Photoshop.
Collars and Tags
Wednesday, March 21, 2007
Tutorial - Engraving a metal tag
This tutorial is written for Photoshop but I hope those of you using other programs will be able to translate this technique and figure a similar way to do the same thing in your program.
1. Open up your metal tag and save it under a new name.
2. Make a new layer above your tag (LAYER>NEW) and use the TEXT tool to type your word/words in black. For my tutorial I used Courier(T1) but other fonts work well, too.
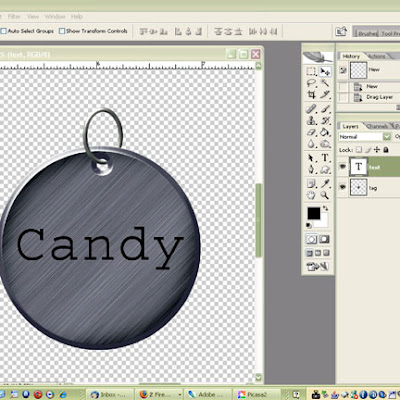
3. Now make sure your text layer is selected. We are going to add a bevel and emboss layer style. Open the layer style dialog box (by clicking LAYER>LAYER STYLE>BEVEL AND EMBOSS).
4. If you're using a font similar to this one, you can leave everything as the default setting except change the direction from UP to DOWN...
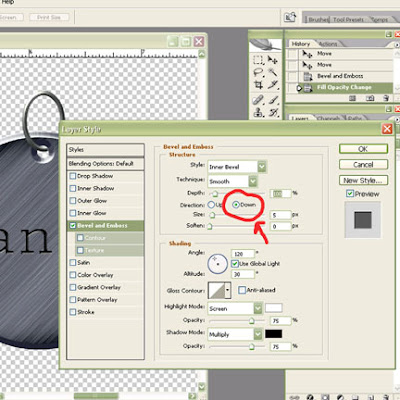 ...However, if you chose a different, bolder font, you may have to play with other settings to get a desired effect. Click OK.
5. Now, make sure your text layer is still selected and change the FILL value to anywhere from 0% to 30%. I used 30% for this font but other fonts look better with the fill value set to zero%.
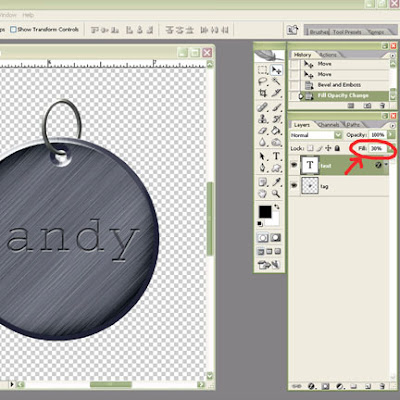
When you are happy with your engraving, you can save your new engraved tag as a PNG and use it in your layouts! Let me know if you have any questions about this tutorial, my e-mail is at the top left corner.
ALSO: for a tutorial on attaching your tag to the collar, Misty Cato has a great tutorial that explains the technique HERE
Have Fun!
1. Open up your metal tag and save it under a new name.
2. Make a new layer above your tag (LAYER>NEW) and use the TEXT tool to type your word/words in black. For my tutorial I used Courier(T1) but other fonts work well, too.

3. Now make sure your text layer is selected. We are going to add a bevel and emboss layer style. Open the layer style dialog box (by clicking LAYER>LAYER STYLE>BEVEL AND EMBOSS).
4. If you're using a font similar to this one, you can leave everything as the default setting except change the direction from UP to DOWN...
 ...However, if you chose a different, bolder font, you may have to play with other settings to get a desired effect. Click OK.
5. Now, make sure your text layer is still selected and change the FILL value to anywhere from 0% to 30%. I used 30% for this font but other fonts look better with the fill value set to zero%.

When you are happy with your engraving, you can save your new engraved tag as a PNG and use it in your layouts! Let me know if you have any questions about this tutorial, my e-mail is at the top left corner.
ALSO: for a tutorial on attaching your tag to the collar, Misty Cato has a great tutorial that explains the technique HERE
Have Fun!
Tuesday, March 20, 2007
My 2 boys!
 Credits: Template7 by SV designs; Papers and elements from Weeds and Wildflower's Welcoming Spring freebie; Fonts, Assimilate and Amanda's hand.
 Credits: Template7 by SVdesigns; Papers and flower by Misty Cato's Starting in Style freebie; Spring quote by Jackie Eckles; Atomic cupcakes painted chipboard action on quote and brackets; Fonts, Childish Alpha and Charlie.
I've been working on another layout of Candy and no matter what I do, I don't like it. Don't you hate it when that happens? I thought I would do a couple layouts of my boys to try and get my mojo back, LOL. I took these pics (and many more) out in the backyard yesterday and had to scrap them. Riley is 2.5 and Hunter is 4.5 and they are loving the sunshine after months of snow! On another note, I hope all of you with pets have not been affected by the pet food recall. Luckily I don't feed Kayla any of the brands listed. I gave both her and Candy PurinaOne for years but Kayla's had such a problem with allergies that I switched her to an all natural food with lots of meat and very little grains and she has less itching now. I did a lot of research on dog food and it's amazing how bad most of the poplar brands are for our dogs. Anyway, if any of your furbabies have been affected, my heart goes out to you...it's so sad.
Thanks for the compliments on my last layouts, It's nice to hear that I'm inspiring people to get those pet layouts done! I'm still putting the finishing touches on my next freebie so hang tight :)
Monday, March 19, 2007
Saturday, March 17, 2007
Doggone Cute

Credits: Based on a template by Sandy Vogt. I didn't use the actual template because it's not available anymore but I used it as a guide.
Happy St Patrick's Day! I finally added my picture so you can see a more recent face behind the kit. It was taken a couple of years ago but I haven't changed much...my hair is a little longer and I have a few more wrinkles but other than that, it's me! (no 80's hair anymore,LOL!)
Friday, March 16, 2007
A little info about overlays

credits: Atomic Cupcake's painted wood action used on the letters
If you haven't used many overlays, I'll give you a little info on them, if you have, well you can ignore this :). I probably should've mentioned this about the overlay that I included in the original kit I put up (the worn overlay) but I'll mention it now. I use Photoshop so I don't know if this is the same in other programs or not. When you place the overlay on the layer above the paper you're using it on, you will get different effects when you change the Blend Mode of the overlay layer. For most of the layouts I've done using the worn overlay, I set the blend mode to "Soft Light" because it makes a very sublte effect. In the layout above, I also used "soft light" for the white words overlay. If you notice, it makes the letters look a lighter shade of the layer it is on top of (eg. the letters look light blue on the blue paper, light peach on the peach paper, etc) To see how each blend mode will affect the layer I highlight the blend mode and use the arrow key to scroll through each mode to see what I like. You can come up with some pretty interesting stuff this way. If I have thouroughly confused you or if you would like to learn more about blend modes, click HERE for a detailed explanation. Experiment and have fun!Thursday, March 15, 2007
Freebie! Pet Words Add-On

Well, this will most likely be the final installment of my Felty Dog/Cat kit (unless I design something while finishing Candy's last layouts, then I will, of course, pass it on to you :)) I am, however, working on another pet freebie that can be used with this kit or any other pet kit. I will have it done sometime in the next week for sure. Thank you to everyone that left me a note of thanks about any part of this kit...it means the world to me and I have read each and every one of them! In this add-on, I decided to do the words as 12x12 overlays so it will offer more flexibility with background colors. I made the small word overlays white but they are really meant to re-color, change the blend mode, add layer styles to or...whatever you desire, just have fun! (Tip: It looks great if you combine one of the colored word overlays on top of one of the small white word overlays on a solid background color!) I even stuck a little something in there for our feathered friends!
Credits: Thank you to Tandika Star at digiscrap designer for tools used in the making of this add-on.
Download Here:
Felty WordArt
Pet Word Overlays
For those of you that are wondering....
I haven't dropped off the planet, LOL! It suddenly became spring here in Colorado so my boys have been dragging me to the parks and playgrounds :). My computer time has been greatly limited lately so no scrapping has been done. I've been trying to do a little at night after the boys go to bed but I guess all the fresh air and sunshine has been making me tired because as soon as I get in bed and turn on my laptop, I start dosing off!!! It's raining here today and the laundry has piled up so I just may get some scrapping AND laundry done before we head to the zoo tomorrow. I have several layouts of Candy half-done and I have another freebie about ready to be released...hopefully late today or early tomorrow. So check back here soon for a goodie!
Monday, March 5, 2007
Pawprint Alpha Freebie!

It was brought to my attention that there are some programs that don't allow you to copy and paste png's from a sheet of multiple png's...like the tag alpha, brads and clips in my original kit. So, if you are among those that can't use my original "clumped" items (or would rather not), I individualized them for you! While I was at it, I created another PawprintAlpha add-on . You can find both downloads below. Enjoy!
Thank you to Tandika Star @ digiscrapdesigner for tools used in the making of this Alpha!
Pawprint Alpha
Original Tag Alpha, brads & clips
 Of course I had to use my new alpha in a layout! I took many pictures of our trip to Lake Tahoe in 1993 but when I got home, my camera with a full load of film was stolen. I was lucky I didn't lose them all. Candy loved the boat and the water! Credits: Template by Tracy B, font: Comic Sans, Atomic Cupcake paper tear action and Tandika Star's metal edge action on the stars.
 Credits: Flourish brush around the photo is a freebie from Cottage Arts.
Font on tag: 4990810
 Credits: Template by Tracy B, Frames from Festival Kit by Shabby Princess (re-colored) and Fonts: 4990810, Comic Sans
Friday, March 2, 2007
Page 1 of Candy's Album
 Journaling reads:
I had decided one day, shortly after graduating from college, that I wanted a black lab. It was an impulsive idea but since I had recently lost my childhood dog of 15 years, I knew I wanted the friendship of a new dog that would be all mine. Since the commitment of school was behind me...I was ready for a new kind of commitment.
The ad in the newspaper read ‘Black lab puppies, 8 weeks old - $25’ That sounded like a reasonable price for a dog, so I called. The person on the phone stated that the puppies had a bit of chow in them but I wasn’t picky. Greg and I took a drive to check them out.
When we arrived, the little puppies were romping around like puppies do. The mom, a lab/chow mix, was keeping a watchful eye on the strangers gathering around. The dad wasn’t around but we were told he was a chocolate lab that lived next door....good enough.
Greg was watching the male dogs but I informed him that I wanted a female. He tried to convince me otherwise but I wanted a girl. While all the puppies were frolicking in the grass, I spotted a cute little black furball off to the side having a grand old time with the water dish. I think she was trying to go swimming in it. I had my heart set on her at that moment. Admittedly, the bright pink collar she was wearing played a part in the decision, too, she looked so adorable.
We paid $25 for her that afternoon in late May, 1993. We brought her home, named her CANDY, and she spent the next 13 1/2 years enriching our lives! I’ve created this album so the memory of her will live on through generations to come.
Credits: White paper and pins are from Vintage Florals by Shabby Princess
Some wonderful comments!
Once again, thank you all for the wonderful comments and I've been given some great ideas for future projects, thank you! I'll do the best I can with birds, hamsters and snakes, LOL! I'm a little confused, though, because I got a few requests for an alpha so I need to clarify that there is an alpha in the kit (see layout above) but I put all the letters in one file so you need to open the file, select the letter you want(I just use the marqee tool) and the copy/paste into your layout. (I know, I did it the lazy way, LOL). If you did not get an alpha, let me know! Happy Scrapping!!!!
Thursday, March 1, 2007
Freebie Add-On!

Well, I needed some more stuff for this kit so I made it and decided to share it with you! Special thanks to Tandika Star @ Digiscrapdesigner.com for tools used in the making of this kit. If you download this, please leave me a comment letting me know if you would like to see more stuff for this kit (specific requests would be great) or maybe a new pet kit in a different style. If I get enough requests, I'll keep adding things...if not, I'll move on to something new. Happy Scrapping!
Download here:
Add-on 1
Add-on 2
Candy as a sweet puppy

Here's the picture that inspired my doodles which then led to my kit :)
I did this layout before I made my kit so for this I used a kit called Legacy by Michelle Shefvelund at Cottage Arts. Fonts are Sweetheart Script and 4990810 from(?).
I did this layout before I made my kit so for this I used a kit called Legacy by Michelle Shefvelund at Cottage Arts. Fonts are Sweetheart Script and 4990810 from(?).
 This is Candy on her first camping trip! The frames and papers are from my new Add-on, coming soon! Font is 4990810 from (?)
 This is me way back in 1993 when I first adopted Candy. We both looked so young! I still had a little of my 80's hair goin' on, LOL! I used Atomic Cupcakes tear action on one of the papers and the font is BlackJack.
Subscribe to:
Comments (Atom)


